Fudgy Cocoa Drops

img_0872

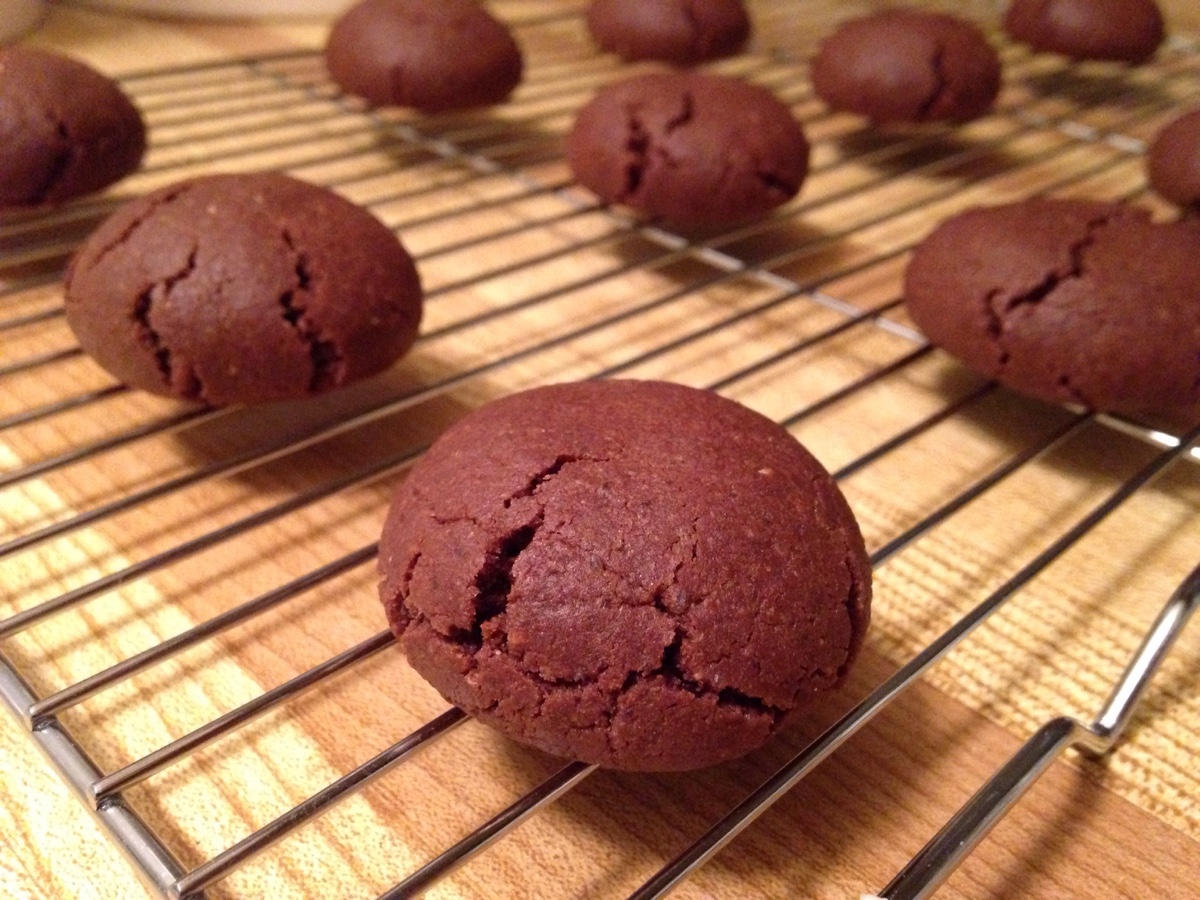
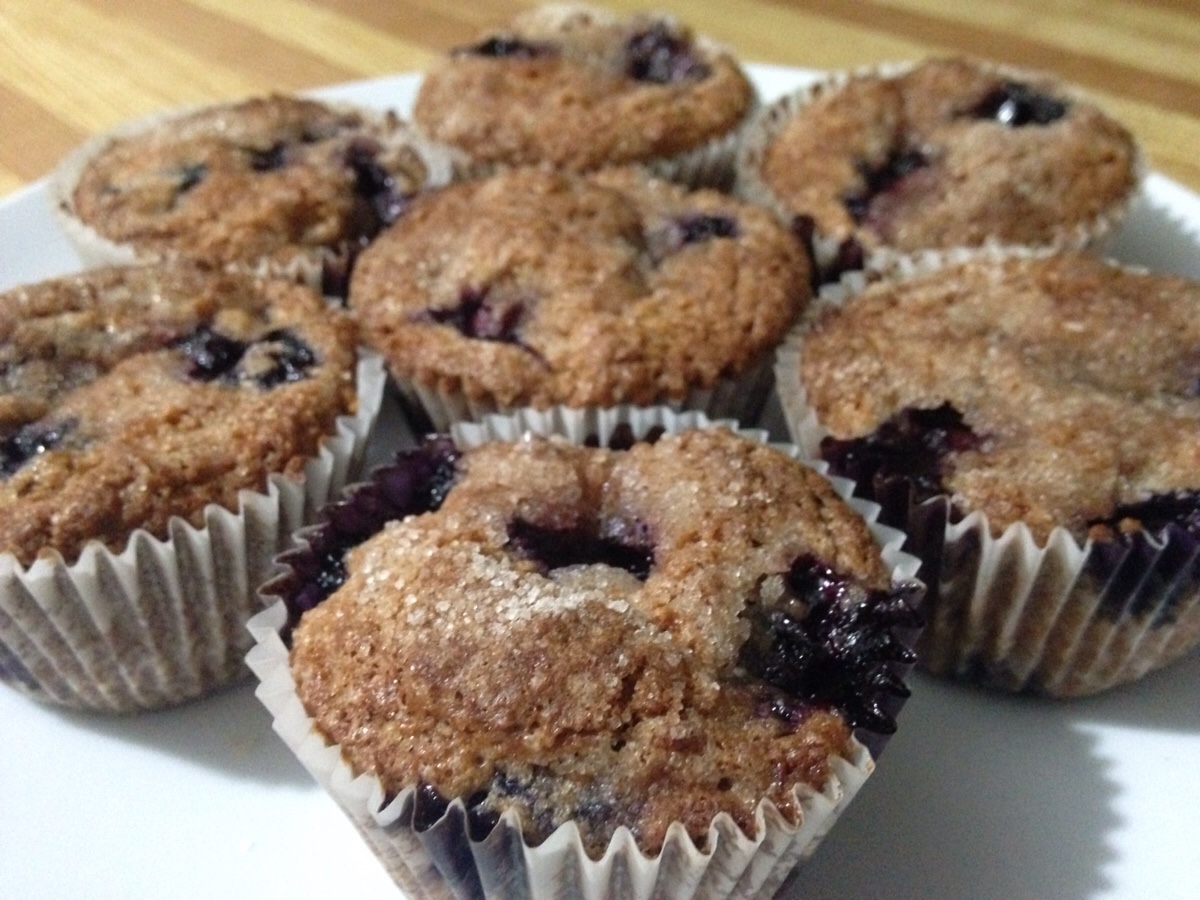
There’s nothing that I don’t love about these little morsels that I found over at Taste of Home website. They come together super fast, are brownie like in both taste and texture, and make a small batch – which is perfect when you’re only baking for one!

Okay, I may have one issue with them: they dry out really, really fast.

Luckily, it’s easy to prevent this from happening by popping them in an airtight container and freezing them the instant they cool down after baking.

A few notes:

    1. If you prefer flat, chewy cookies over soft, puffy ones, simply flatten the dough balls slightly using the bottom of a glass, a fork, or, in a pinch, the palm of your hand, before baking.
    2. Most of us don’t have much use for ground almonds (and you can get away without using them here) but I highly recommend purchasing a small bag. Leftovers can be frozen in an airtight container for up to 6 months, which is great since you’ll have them ready for the next time you want to bake these cookies, and, trust me, you will want another batch!
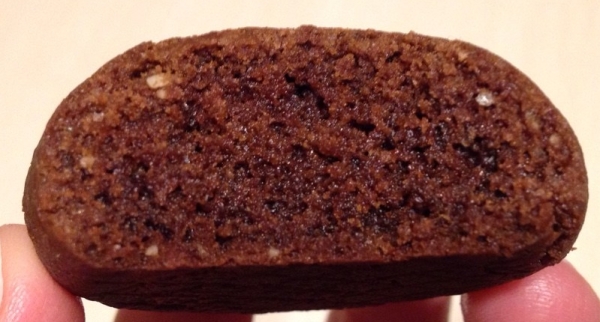
    3. Be careful not to overbake. As mentioned, these cookies are suppose to have a fudgy, brownie-like texture which will be lost if overbaked. Start checking for doneness around the 12-minute mark.
    4. For an extra special treat, wrap the dough balls around whole almonds!
img_0874
I just love all those little specks of almonds!

INGREDIENTS:
1/4 cup butter, room temperature
1/2 cup sugar
3 ½ TBS. milk, room temperature
3/4 tsp. vanilla extract
3/4 cup flour
1/4 cup cocoa powder
1/2 tsp. baking powder
1/8 tsp. baking soda
1/8 tsp. salt
1 Tbs. natural ground almonds

METHOD:
Preheat oven to 350°F. Line a baking sheet with parchment paper; set aside. In a medium mixing bowl, beat butter and sugar until light and fluffy. Beat in milk and vanilla until well mixed. In another bowl, sift together flour, cocoa powder, baking powder, soda and salt; mix into the butter mixture along with the ground almonds until well combined.

Use a 1-Tbs. cookie scoop to measure out dough and roll into balls (you should get about 1 dozen). Place two inches apart on the prepared cookie sheet, flatten slightly if desired. Bake until cookies are set and the tops begin to crack, approximately 15 minutes. Let cookies stand on the baking sheet a few minutes before removing to a wire rack to cool completely.

Nutritional Information:
Calories (per 2 cookies): 182
Fat: 8.8g
– Saturated Fat: 4.9g
– Cholesterol: 20.7mg
Sodium: 155mg
Carbohydrates: 26.8g
– Fibre: 1.9g
– Sugars: 12.3g
Protein: 2.9g

Running News

Happy, Happy New Year everyone!

How was your holiday?

Mine was very quiet and peaceful, just the way I like it!

Prior to the holidays, on Dec. 1st, to be exact, I challenged myself to do something I’d never done before.

Taking part in a winter fun run.

Pros:
– Proceeds from the event went in support of the Salvation Army.
– The event was very well organized.
– Great volunteers.
– The medals were absolutely gorgeous.

Cons:
– It was cold.
– The steep grade up those two bridges (and back again) were brutal on my knees.
– It was cold.
– Having to pay for parking kinda, sorta sucked.
– It was cold.
– I slipped and fell on a patch of glare ice. (No real harm done other than a bruised ego).
– Did I mention it was cold?

Would I do it again??

Hmmmm, depends on the medal 😉

The day after the Santa Shuffle I was out braving the cold for another 5K. But this was neither a race nor training run.

This particular run was the first of four needed to complete a virtual event – another first for me.

Because participating in virtual events is so ridiculously easy, taking little to no effort (especially if you’re the cheating kind) I really wanted to earn this medal, in the truest sense of the term. So I decided to push past my comfort zone and run all 4 5Ks outdoors in the miserable cold.

Normally, I take to the treadmill the minute the temperatures begin to drop, so this was indeed a challenge for me!

Once again, the medal was a great incentive to embrace (NOT!) the cold and get the job done!

So that is how the last month of the year went for this gal.

How adorable!img_0849

Looking forward into 2019: Depending on how well my knee handles the increased mileage, I have hopes of finally participating in the Royal Canadian Air Force half marathon at the end of May. This is the race that I credit with making me want to take up running on a more serious note, but one that I have yet to actually run.

Training for this event should begin sometime next month and I will keep you posted on how it goes.

In the meantime, I hope that 2019 brings you all good health, prosperity, happiness and, above all, lots of love!

Banana Chocolate Chip Cookies

Wishing all my readers a very Merry Christmas!!

This month’s recipe isn’t very Christmas-y but is one my very favourites.

Because I bake these cookies so often, I was convinced that I’d shared them with you a long time ago.

Imagine my surprise when my search here yielded no results!

So I’m here today to offer up my sincerest apologies and rectify this major oversight of mine.

Much like the cookies I shared last month, these have a wonderfully soft, cake-like texture. As an added bonus, they bake up just as well when made as mini muffins!

I hope you enjoy them as much as I do!
IMG_0056
Adapted slightly from Taste of Home

INGREDIENTS:
1/3 cup butter, softened
1/2 cup sugar
1 egg
1/2 cup mashed banana
1/2 tsp. vanilla extract
1 ¼ cup flour
1 tsp. baking powder
1/8 tsp. baking soda
Pinch salt
1/2 cup mini chocolate chips

METHOD:
Preheat oven to 350°F and line 2 baking sheets with parchment paper; set aside. In a mixing bowl, beat butter and sugar until light and fluffy. Beat in egg, banana and vanilla. Combine flour, baking soda, baking powder, and salt; gradually add to butter mixture and mix well. Stir in chocolate chips. Drop by tablespoonfuls 2 inches apart onto prepared sheets. Bake 12 to 15 minutes or until edges are lightly browned. Remove to wire racks to cool. Yields 2 dozen.

If you’d like to try baking them in mini muffin tins, reduce flour to 1 cup. They shouldn’t take much longer to bake than the cookies, so I’d recommend checking around the 12-minute mark. Muffins are done when a toothpick inserted in the center comes out clean.

Frosted Orange Cookies

Hello everyone!

I hope my fellow Canadians had a beautiful Thanksgiving long weekend?!

And, of course, wishing a very happy upcoming thanksgiving to all my readers south of the border!

Oddly enough, our family never celebrated this particular holiday.

It wasn’t until about 4 or 5 years ago that I decided to take on the challenge of making a big dinner, and I continued to do so up until last year when, once again, the holiday came and went virtually unnoticed.

It’s hard for me to admit, but I have lost much of my enthusiasm for cooking and baking.

Shocking, I know.

The lack of interest began shortly after we moved into our new apartment. The tiny kitchen coupled with an oven that yields poor results makes for a rather grumpy home cook!

Despite the less-than-ideal kitchen, I have faced off with my new nemesis (read: The Oven) and tried a few new recipes, and this one is definitely worth sharing!

I have made these cake-like, delicately flavoured cookies a few times and experimented a bit with great results. I added sweetened dried cranberries to the batch shown below, and think they would make a lovely addition to your Christmas cookie tray.  You can even substitute lemons for oranges (yum!)
img_0483
Adapted from Grandma Brubaker’s Orange Cookies

INGREDIENTS:
For the cookies
1/2 cup butter, room temp.
1 cup sugar
1 egg, room temp.
1/2 cup buttermilk*
3 cups flour
1 tsp. baking powder
1 tsp. baking soda
Pinch of salt
The juice and zest of 1 medium orange
1 cup dried cranberries (optional)

For the frosting
2 ½ cups icing sugar
1 Tbs. butter, room temp.
1/4 cup orange juice
1 Tbs. orange zest

METHOD:
Preheat oven to 325°F. Line baking sheets with parchment paper; set aside. Juice and zest the orange and set aside. In a medium mixing bowl, cream together the butter and sugar. Beat in egg and buttermilk. Sift together flour, baking powder, baking soda and salt; add alternately with orange juice and zest to the creamed mixture; beat on low just until incorporated. Stir in dried cranberries, if using. Drop dough by teaspoonfuls onto prepared baking sheets 2-inches apart. Bake 10 minutes or until cookies spring back after pressing the tops lightly. Remove to wire racks to cool completely. In the meantime, prepare the frosting by beating together icing sugar, butter, juice and zest. If the frosting is too thin, add a little more icing sugar, if it’s too thick, add a few drops of milk (or additional orange juice if you have any left). Spread an even layer of frosting over cooled cookies and let set. Yields approx. 3 dozen cookies.

*If you don’t have buttermilk simply add 1/2 tsp. vinegar to 1/2 cup of milk and let stand 5 minutes. Voilà, buttermilk! If you like, you can even forego the process altogether and just use milk, the end results will still yield a great little cookie!

Running News

sauconykinvara7Hello again!

So what’s new in the running department?

Well, the biggest news is that the long-awaited MRI was finally done on my left knee earlier this month, and the official diagnoses was far better than I had dared to hope: Stage 2 chondromalacia patella. In layman’s terms, a softening of the cartilage beneath the knee cap.

I was told that it is a highly treatable condition and that with time and physio (involving various strengthening exercises) I can regain stability of the joint.

As with all chronic medical conditions, there are some activities that are beneficial and some that are to be avoided at all costs.

Thankfully running (at least short distances) isn’t one of them

How this will effect my goal of running another half marathon – namely the RCAF half that I have been dying to run – is questionable, but I’m going to train for it as best I can and let my body decide if it’s feasible.

And it’s difficult to predict how things will go.

While I was able to run throughout the summer without much issue, the offending knee became unstable once again about a week ago 🙄

I can’t help but wonder if the cold is having some effect on it, because the temperatures have dropped sharply of late.

Time will tell, because I’m hoping to run outdoors as much as possible this winter, something I have never attempted in the past because I simply detest winter!

In other news, I just purchased a new pair of Saucony’s, the Kinvara 7 to be exact (pictured above) and love them to pieces, just as I did the 6’s and 2’s. The Kinvara is definitely my shoe of choice 😉

And finally, I am thinking of registering for the Santa Shuffle on Dec. 1st. This event raises money for a charity that I can totally get behind: The Salvation Army.

Stay tuned for an update in 2 to 3 months time!

Vegetable Soup

Hello, hello!

I imagine everyone has a recipe tucked away for vegetable soup. And little wonder, it’s ridiculously easy to modify, from batch to batch, based on what you have on hand.

But, just in case you don’t already have a good recipe on hand, I will share my version of the one I found here.

Jaclyn has the most amazing site. Her photos are gorgeous and make you want to eat your computer screen. Seriously, go have a look and see for yourself!

Anyway, I’ve made this soup numerous times, using slightly different ingredients each time, and I’m convinced that you could go crazy with this recipe and still have amazing results.

So without further ado, here is my take on a good vegetable soup! But be warned, there is a LOT of chopping involved, so plan ahead and get that out of the way the night before!IMG_1765

INGREDIENTS:

2 TBS. olive oil
4 cups cabbage, chopped
1 ½ cups chopped onion
1 ½ cups sliced carrots
1 ½ cups sliced celery
4 cloves garlic, minced
2 litres beef broth
3 to 4 cups water (start with 3)
2 LBS roma tomatoes¹ peeled, seeded and diced (or 2 large cans of diced tomatoes)
2 cups diced potatoes
2 cups chopped green beans
2 bay leaves
1/2 tsp. each dried thyme, dried parsley, and rosemary
1/4 tsp. ground black pepper
1 tsp. salt
1 cup Israeli couscous, uncooked²
1 cup frozen or fresh corn
1 cup frozen or fresh peas

METHOD:

Heat oil in a large Dutch oven, add cabbage, onions, carrots, and celery and sauté over medium-low heat until veggies are crisp-tender. Stir in garlic. Add broth, 3 cups water (add the fourth cup as needed depending on how thick you want the soup), tomatoes, potatoes, green beans, bay leaves, and seasonings. Bring to a low boil and cook until potatoes are almost cooked through. Finally, add couscous, corn and peas. Bring to a boil again, then reduce heat and simmer 5 to 10 minutes or until all ingredients are cooked through. Taste and adjust seasonings as desired.

¹ I no longer purchase canned tomatoes, instead, I opt for fresh. Yes, it’s EXTREMELY time consuming but far healthier. Here’s how to prep fresh tomatoes: With a sharp knife score an “X” through the skin at the bottoms of tomatoes, place in a pot of simmering water, make sure water completely covers the tomatoes. Let them sit for 30 seconds then remove to a bowl of ice water. The skin will now be easy to peel off. Chop finely, and add (along with any juices) to the soup.

² You can substitute soup pasta, barley, millet, rice, quinoa, etc., or none of the above, if you are so inclined.

Southwestern Beef Skillet

Hello again! How has everyone’s summer been going?

I can’t believe how quickly it’s passing us by (pout!)

The good news is that we can expect to have at least a few more hot, sunshiny days, and I hope you’re able to get out there and enjoy them!

Moving on to this month’s featured recipe…

I have made this dish twice now, the first time using green bell pepper & black beans, and yesterday with red bell pepper & green beans, and have not been disappointed. I will say, however, that I much prefer it with green beans.

There are many things to love about this dish; it is chock full of amazing flavour, clean-up is super easy, and it comes together very quickly, especially if you use my time-saving trick of cooking the rice, shredding the cheese and chopping the veggies the night before.

img_0438
Adapted from: Southwestern Beef Skillet

INGREDIENTS:
180g (around 1 cup) uncooked brown rice (or approx. 3 cups cooked)
1 LB extra lean ground beef
1 Tbs. taco seasoning
1/2 tsp. ground cumin
1/2 tsp. sea salt
1 small red bell pepper, diced*
1 cup green beans, chopped into 1-inch lengths
1 cup salsa
1 cup corn
1 cup shredded cheddar cheese*
1/2 cup green onions, sliced

METHOD:
Cook rice according to package directions. In a large skillet, cook the ground beef until no longer pink. Drain beef; return to skillet and add seasonings, peppers and beans. Cover and simmer until veggies are crisp-tender. Stir in the rice, salsa and corn; heat through. Top with cheese and green onions, cover until cheese is melted. Stir to combine, serve and enjoy!

Recipe will yield 4 to 6 servings.

*NOTE: If you like a LOT of heat, try subbing jalapeño peppers and habanero cheese.

Made using green bell pepper and black beans. Either way, the taste is great!IMG_0153[1]

Nutritional Information
(based on 4 servings per recipe)
Calories: 505
Fat: 15.3g
– Saturated Fat: 7.3g
Sodium: 515mg
Carbohydrates: 53.2g
– Fibre: 4.7g
– Sugars: 6.4g
Protein: 35.7g

Blueberry Streusel Muffins

This month I am sharing with you a recipe that I have made so many times, I have literally lost count.

Hey, they don’t call them “To Die For Blueberry Muffins” for nothing!

I believe the only recipe I have made more often is this Chocolate Cake.

Mmmmm. Chocolate cake!

Sorry. Where was I?

Oh yeah.

I found these muffins over at All Recipes and, while they would be great as written, I made a few modifications based on personal tastes and the application of a little common sense.

Because no muffin should have as much sugar as originally written.

Like, EVER!

Don’t get me wrong, I have absolutely nothing against sugar and we all need to treat ourselves every now and again.

But, let’s be honest here, sugar is a calorie bomb, and an empty one at that. Certainly something I need to be mindful of considering my constant struggle to maintain a healthy body weight. So you can see why I try to use a little common sense here 😉

OK, getting off my soap box now!

One final note: I find that fresh blueberries taste best in this recipe, but feel free to use frozen if that’s what you have on hand. Just be sure NOT to thaw them before use – and mix them in very gently – otherwise your batter will turn blue!


INGREDIENTS:
-for the streusel
1 Tbs. a/p flour
3 Tbs. sugar
1/2 tsp. ground cinnamon
1 Tbs. cold butter
for the batter
1 1/2 cups spelt flour
1/2 cup sugar
1/4 tsp. salt
2 tsp. baking powder
1 tsp. ground cinnamon
1/3 cup peanut oil
1/3 cup whole milk
1 egg
1 cup fresh blueberries

METHOD:
Combine the streusel ingredients, cutting the butter into the flour mixture until it resembles coarse meal. Some slightly larger, pea-sized pieces are fine. Place in refrigerator or freezer while you make the batter.

Preheat oven to 400°F. Line an 8-cup muffin tin with paper cups; set aside. In a large bowl, thoroughly mix together flour, sugar, baking powder, cinnamon and salt; set aside. In a medium bowl whisk together the oil, milk and egg; stir into the flour mixture until just combined – DO NOT OVERMIX! Gently fold in blueberries and divide batter between muffin cups. Sprinkle the streusel mixture over the tops and bake 20 to 25 minutes.

Nutritional Information
Calories: 269
Fat: 11.8g
– Saturated Fat: 2.9g
Sodium: 100mg
Carbohydrates: 39g
– Fibre: 3.5g
– Sugars: 21g
Protein: 4.4g

Running News

RNPNo new recipes to share this time around (sorry!) But seeing as it has been 3 years since my last “Running News” post, I thought now would be a good time to fill you all in on what’s been happening.

The past few months haven’t gone as well as I had hoped, or planned. My old knee injury flared up and sent me to a doctor a few weeks ago. He suspects it’s a torn meniscus, but my symptoms sound more like patellofemoral syndrome to me.

We will see who wins the “name that injury” contest in September, when I go in for an MRI. This should have been done back in the spring of 2016, but the appointment was canceled due to the chaos of a move.

Oh, and if an old knee injury isn’t bad enough, I just had to add a sprained ankle to the mix in late March / early April.

On the perfectly flat, secure surface of a treadmill, no less 🙄

Despite these injuries, I have stubbornly refused to stop moving (🤔 I wonder if that’s why the ankle has been slow to heal?!) and continued to train for and run a 5km road race on May the 12th. This is my favourite event of the year and one that I had participated in for 5 years in a row, so I wasn’t about to miss out on year no. 6!

IMG_0024Both the ankle and knee held up nicely during the race, and I kept to a snail’s pace of 7 min/km. But oh the heart rate! It was through the roof and I felt like dying by the time I crossed the finish line… 35:35 later (according to my watch).

I am capable of completing a 5K in about 34 minutes on a good day (my personal best was 30:58 during a training run) but as far as races go, this was my fastest time.

So there’s that.

All things considered, I look at these injuries as a mere annoyance. Even though I’m not able to run the distances that I use to (yet!) I realize that mobility is a precious gift that is all too easily taken for granted, so, I count my blessings!

While I wait for the official diagnosis, I will run when I can, walk or cycle when I can’t, and hope I can kick these injuries to the curb before the year is out!

Garlic Parmesan Pull-Apart Bread

Today I have for you a deliciously addicting bread. It’s the perfect accompaniment for any pasta dish or soup that you would normally serve with a side of garlic toast/bread. Only these are so much more fun to eat 😉

The original recipe calls for frozen dinner rolls but that just doesn’t cut it for me. I prefer to make as much from scratch as possible and my tried and true dinner roll recipe works beautifully here.

However, if you’re pressed for time, intimidated by the whole bread-baking process, etc., etc., feel free to use frozen rolls. Don’t worry, I won’t judge!

You could put these little tidbits of garlicky goodness over the top by stuffing a small cube of mozzarella cheese into each one before baking – in essence, making cheese bombs!! I’ve been wanting to do this myself but, oh, the calories!

Must. Not. Indulge!

You have two more options when making these:

1) Pile all the dough balls into a bundt pan.

2) Divide the dough balls between two 8- or 9-inch round cake pans.

Since I’m only baking for myself, I prefer method no. 2. What I do is place half the dough in the freezer (after kneading but before the first rise) and make only a single cake pan’s worth of bread and, of course, halving the topping ingredients.

However you choose to make these, be sure they make an appearance at your next pasta dinner table. You won’t be sorry!

img_0082

INGREDIENTS:
For the dough
1 cup warm (∼100°F) water, divided
1½ tsp. yeast
2 TBS. sugar, divided
3 cups a/p flour, divided
3/4 tsp. salt
1 egg

For the topping
1/2 cup butter, melted
1 cup Parmesan cheese, divided
1½  tsp. garlic powder
1/2 tsp. onion powder
1/4 to 1/2 tsp. salt
1 tsp. dried parsley flakes
1/2 tsp. Italian seasoning

METHOD:
In a small bowl, combine 1/4 cup of the water with the yeast and 1/2 TBS. of the sugar; let sit until foamy. To the bowl of a stand mixer with the dough hook attached, add 2 cups of the flour, salt and remaining sugar. Stir in yeast mixture, egg, butter and remaining water. Allow the machine to knead the dough 5 to 7 minutes, adding in the last half-cup of flour as needed until dough is no longer sticking to the bowl. Remove dough from mixing bowl, knead a few times then place in a well-oiled bowl. Cover and let rise in a warm place until doubled in volume, about 1 hour.

Grease (or line with parchment paper) 2, 8″ round cake pans; set aside. In a large bowl, stir together topping ingredients, minus 1/2 cup of the cheese, you will use that for sprinkling over the rolls later. Divide dough into 64 (roughly) equal pieces, add a handful at a time into the bowl with the seasoned butter and toss to ensure all dough balls are generously coated and not sticking to each other. Divide the dough balls between the two pans, drizzle any leftover butter over the tops and sprinkle with remaining Parmesan. Cover with plastic wrap and let rise again until doubled. Bake rolls in a preheated 350°F oven for 20 minutes or until tops are golden brown.